Wednesday, 14 September 2016

Install and configure SonarQube for Python code

In this blog post I will show you how to install and configure SonarQube in order to manage the code quality of your Python project.

Installing SonarQube

  1. Go to the SonarQube official website and download the latest version. At the time of writing this blog post the latest version is 6.0.
  2. The downloaded file is in a ZIP format so you have to unzip it in a folder of your choice. I am using Ubuntu so I extracted the zip in /opt/sonarqube.
  3. Now open a terminal/command prompt and go to $SONAR_INSTALL_PATH/bin/$OS where $OS is your operating system. For me it is linux-x86-64.
  4. Depending on you operating system you can start the SonarQube server as follows:
    1. For Windows - type StartSonar.bat and hit Enter.
    2. For Linux/MacOS - type ./sonar.sh console and hit Enter.
      If you have some issues related access denied then run the command as sudo.
      If you have some issues related to JVM such as "wrapper  | Unable to start JVM: No such file or directory" or similar then go to $SONAR_INSTALL_PATH/conf and open the wrapper.conf file. Edit the wrapper.java.command property and set it to an appropriate Java path. In my case it is /opt/java/jdk1.8.0_101/bin/java.
  5. Open a browser and go to http://localhost:9000/. If you see something then everything is ok. Otherwise you should take an eye on the console output and investigate the issue.

Installing the Python plug-in

  1. Open a browser and go to http://localhost:9000/
  2. Log in with admin/admin.
  3. Go to the  Administration tab -> System -> Update Center (these may vary due to your SonarQube server version).
  4. Click on the Available button.
  5. Search for the Python plug-in and choose Install.
  6. Restart the SonarQube server if needed.

Installing SonarQube Scanner

  1. Go to the SonarQube Scanner page and download the latest version. At the time of writing this blog post the latest version is 2.7.
  2. And again the downloaded file is in a ZIP format and you have to unzip it in a folder of your choice. In my case it is in /opt/sonar-scanner.
  3. Optional but a good idea is to add the $SONAR_SCANNER_PATH/bin to your path variable because the sonar-scanner command will be used later.
  4. Now is the time to configure some settings of the scanner. Open the $SONAR_SCANNER_PATH/conf/sonar-scanner.properties file. You can set some properties for your project. The most common and their defaults are:
    1. sonar.host.url=http://localhost:9000 - the URL of the SonarQube server
    2. sonar.jdbc.username=sonar - username for the database (if you want an external database)
    3. sonar.jdbc.password=sonar - password for the database
    4. sonar.jdbc.url - the URL string to the database (Oracle, MySQL, Postgre and so on)

Configuring the project to be scanned

  1. Go to the Python project you want to scan and create a file named "sonar-project.properties".
  2. Now edit the file and set some properties:
    1. sonar.projectKey=my:project - the project id
    2. sonar.projectName=My project - the project name
    3. sonar.projectVersion=1.0 - the project version
      These 3 properties are required
    4. sonar.sources=src1,src2 - the directories with sources you want to scan (comma-separated)
    5. sonar.language=py - the programming language (Java, Python, etc.)
    6. sonar.python.pylint=/usr/local/bin/pylint - the path to the pylin, if you want to include some quality rules from it

Running the scan

  1. Make sure the SonarQube server is up and running.
  2. Open a terminal/command prompt and navigate to the project folder where the "sonar-project.properties" file is located.
  3. Type sonar-scanner and hit Enter (if you added the sonar-scanner path to you path variable, otherwise use the absolute path to the command).
  4. When the execution is done go to the SonarQube server URL, e.g. http://localhost:9000.
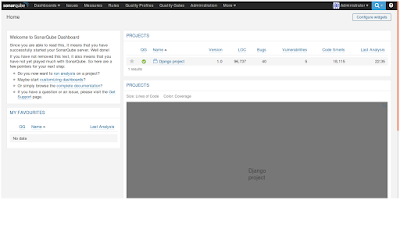
  5. You should see something like this:
  6. You can log with admin/admin credentials and make some investigation of the features.

    Conclusion

    That was just a brief explanation of how to run a Sonar scan over your Python project and the aim was not a review of the Sonar functionalities.

Saturday, 9 January 2016

Reading/Writing data from/to Arduino with Python

In this blog post I will show you how to read and write data from Arduino with Python over a serial interface. I will use a library called "pySerial". Although I'm using Ubuntu the library is said to work well across all operating systems.

Prerequisites

  1. Python
  2. Arduino IDE
  3. Some of the Arduino boards (Uno, Mega, etc.)
  4. USB cable between the Arduino board and your PC

Installing pySerial library

You have two options for installing pySerial - using pip (a package manager for Python) or downloading the library and installing it manually.
1. Using pip.
I assume that you are familiar with pip . If you have Python 2 >= 2.7.9 or Python 3 >= 3.4 then you already have pip by default. If you do not have pip then you have to install it. Detailed information on how to do that could be found here. The following steps are executed in Linux environment so Windows users should skip the 'sudo' part in the commands.
Open a terminal and type the following command:
That should be enough to start using the library for most of the users but in my case I had pySerial already installed so I upgraded it with the following command:

You can check the version of the library with
You should see pySerial and its version in the list.
2. Installing pySerial manually.
You have to download the library from here. Windows users can make use of the .exe installer but I'll show you how to install the library from archive. Get the archive named 'pyserial-x.x.tar.gz'. It should be uncompressed into a folder. Windows users may need to install an additional archiver like 7-zip for working with tar.gz. For Linux just open a terminal and type the following:

The last step is to navigate to the folder (on terminal/command prompt) you have just uncompressed the archive into and type the following:

Whichever of the methods you chose that should be enough to start using the library.

Reading data

Connect your Arduino with the PC and open Arduino IDE. Now you can see the device name in 'Tools -> Serial Port' menu. In my case the name is '/dev/ttyACM0'. See the screenshot below.
Remember the name as we will make use of it later. Now copy the code below, paste it in the Arduino IDE sketch worksheet, verify it and upload it on the Arduino board.
Now open IDLE and copy&paste the code below.
Now is the time to replace {device_name_placeholder} with your device name that you remembered (in my case '/dev/ttyACM0'). You can run the script and you should see the word "Arduino!" printed continuously in the console.
If you use Serial.println() in the Arduino code then you should use ser.readline(). Using ser.read() won't read anything because you are printing lines.

Writing data

Writing data to Arduino is easy too. See the code below.
Replace {device_name_placeholder} with your device name again. Note the 'b' before 'Arduino'. It is only used in Python 3 because strings are Unicode by default and they should be converted to bytes. For Python 2 you can skip it.

Conclusion

That was a simple example on how to read and write data from and to Arduino in Python. I will show you soon how to use that to make a simple cyclecar that is controlled by a GUI application.